

Absolutely! While it certainly requires some skill development and practice, anyone can learn the basics of trimming a horse’s hooves. That being said, it’s important to consult a professional hoof care provider for underlying conditions.
Let’s explore some key parts of a horse’s hoof you should be aware of before you begin trimming.
Brief Anatomy of a Horse’s Hoof
A horse’s hoof is an incredible feat of natural engineering. From the Hoof Wall to the Frog, every structure has a unique role to play. If properly trimmed and maintained, a barefoot hoof is a natural and healthy option for a horse. And that’s where FormaHoof can help!
FormaHoof replicates the natural biomechanics of the perfect barefoot hoof, supporting effective hoof function. And the best part? Anyone with basic trimming skills can apply it. Interested in learning more? Check out our free courses here!
The Hoof Wall
The outer layer of the hoof capsule is called the hoof wall and is comparable to our fingernails. It is made up of keratinous material that continuously grows if it is healthy, and its purpose is to provide stability and support while the horse is moving.
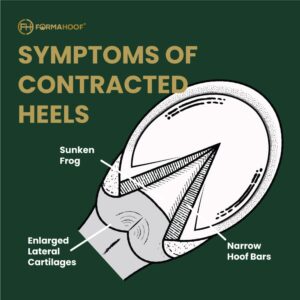
The Horse’s Frog
The Frog, the V-shaped part extending from the heel bulbs towards the toe, acts like a blood pump. Every step your horse takes helps pump blood back up to the heart. But how can you maintain its health? Learn more about it’s importance in this article.
The Hoof Sole
The sole is the underside of the hoof. A healthy sole protects the inner structures of the hoof capsule and underlying bones. A healthy sole is slightly concave and hardly touches the ground. The structure is similar to the keratin of the hoof wall, but in most cases is softer and so is more easily worn down than the wall.
Want to delve deeper into the horse’s hoof structures and their functions? Our detailed online courses or webinars like “Barefoot vs Shod” by the Equine Documentalist Yogi Sharp are a great place to start.
Hoof Trimming Basics – Step-by-Step Guide
Required Tools:
- Hard Brush
- Rasp
- Nippers
- Hoof Knife
- Gloves (Optional)
- Hoof Stand (Optional)
Before you start – Gather your tools and get the horse’s leg into position.
Aligning your tools will help avoid distraction and interruption during your trimming process. We recommend having your tools close enough to reach them, but out of the reach of your horse.
Next, pick up your horse’s front leg as you do when picking out the hoof – when the leg is up, place it between your knees, which will hold the leg in position. The hoof should face you when looking down, which will give you a good overview of the entire hoof. Try to keep your horse in a centered alignment and avoid pulling the leg into any unnatural position which will make your horse uncomfortable.
Make sure you and your horse are in a comfortable environment (this should also apply for farrier visits). A kicking horse is clearly uncomfortable with the situation and can cause injuries to themselves and yourself.
Tips and Tricks:
Depending on the circumstances, hooves can be hard and dry. Soaking the feet for approx. 20 minutes before trimming can make the work easier.
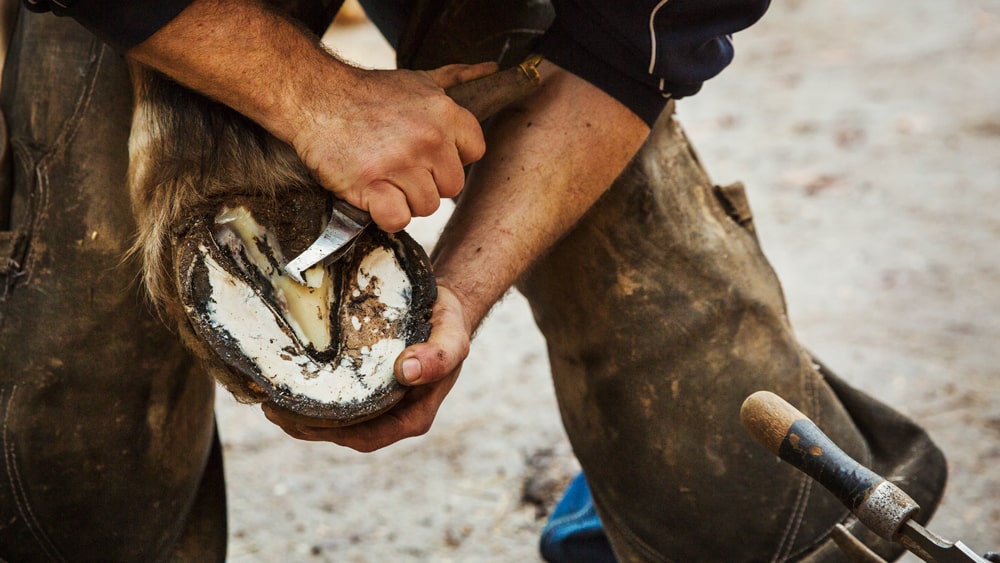
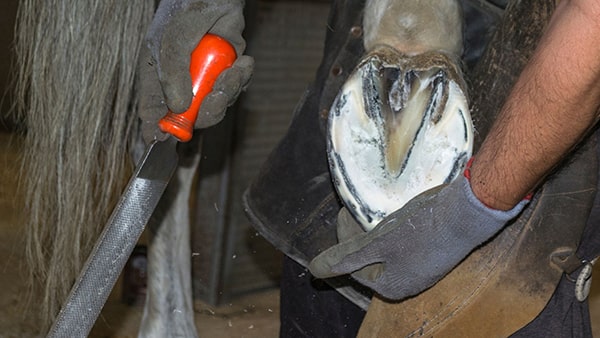
Step 1 – General cleaning of the hoof
As a horse owner, you already know about the importance of daily hoof cleaning and picking out. Therefore, it should be easy to remember that cleaning the hoof is the first step when trimming.
Cleaning the hoof with the hoof knife is easy. However, the knife is sharp and handling should always be carried out with caution.
As your knees are holding the horse’s hoof, your hands should be free to move. However, you should use one hand to support the stability of the foot whilst working on it. Hold the knife with your strong hand facing you and the hook pointing inward.
Depending on the amount, hardness, and thickness of the dirt you may need to scrape the sole several times before it becomes reasonably clean.
You can use the bent front piece of the knife to clean out the collateral grooves on each side of the frog. Make sure to remove dirt and mud from the area without pressure to avoid any unnecessary cuts or puncture wounds from the knife.
Last but not least use your brush or wire brush to get rid of dust and any remaining dirt.
Step 2 – The actual hoof trim
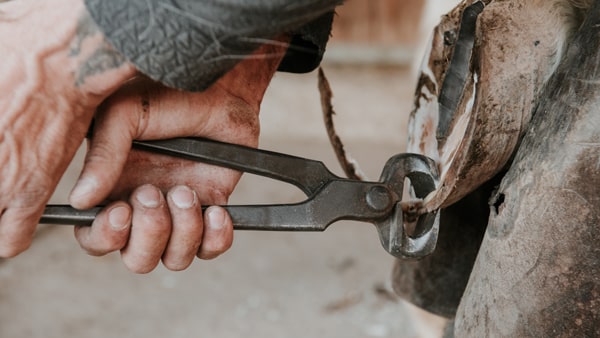
Take out your nippers and start trimming your horse’s hooves. The nippers should be sharp to ensure easy removal of the excess wall and avoid any ripping and tearing during the process.
Your hoof nippers work like nail cutters — by placing them on the edge of the wall you can cut excess hoof around the entire foot with little effort. Make sure to start with small amounts before you are comfortable enough to decide how much hoof can be taken off during a trim.
Make sure your nippers are flat on the foot and the handles are pointing up to you to avoid cutting awkward angles into the hoof. To avoid a sharp toe, trim the front of the hoof at a 45-degree angle.
Hoof trimming is about trimming the overgrown hoof wall and allowing your horse to go forward comfortably. Most horses need regular trimming in a 3-6 week cycle when kept barefoot. However, the growth will depend on different factors such as age, fitness, overall health, and activity level. It is recommended to keep an eye on your horse’s growth and wear to find the best-suited schedule.
Step 3 – Filing the hoof
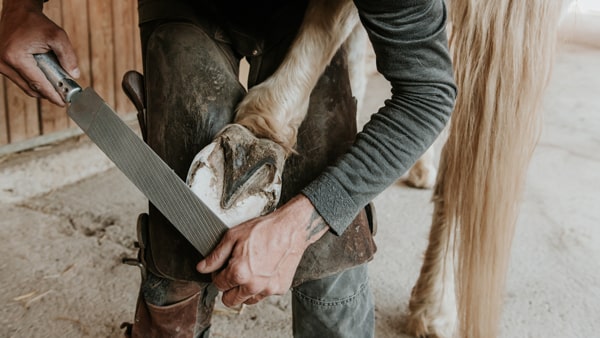
Filing is the harder part of the trimming process. As you know from cutting your nails, a nipper (or nail cutter) can leave sharp and unwanted edges. To smooth these, you file down your nails and this is the next step for your horse’s hooves as well.
While your knees are still holding the hoof in position, you want to use both hands to hold on to your rasp. Make sure you are in a stable position where you can stay balanced while holding the foot. Work slowly, being careful not to file the sensitive sole and frog areas. Use the white line in the hoof as a guide to ensure that you are rasping only the safe zones.
Check the heels for any unevenness. Don’t drag the rasp across both heels at the same time. Instead, identify the higher of either heel and file it down to the other’s level.
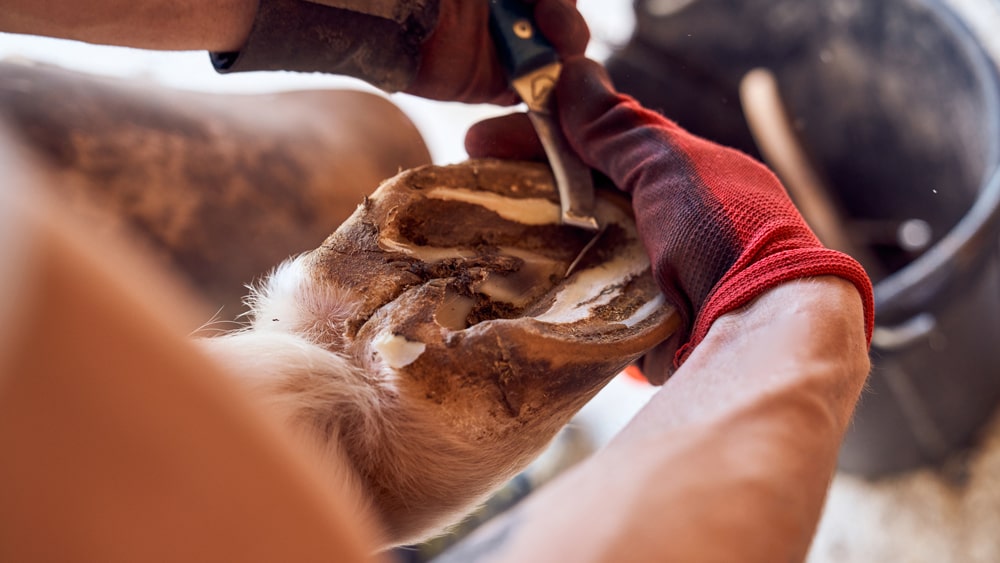
Step 4 – Remove excess sole and frog material
It is important not to touch the sole until you’ve reached a stage in your education where you can distinguish between live sole, exfoliating sole, and retained sole.
Live sole has a waxy appearance while exfoliating sole is either chalky and comes off easily with your hoof pick or has cracks and edges that look like they can be peeled away. Retained sole is usually quite smooth and frequently fuses with the frog.
What is recommended here is that if you’re not sure, don’t remove it. However, if a part of the sole is not ready to be removed, it will be quite difficult to do so anyway, so this can provide reassurance of what should or shouldn’t be filed. If it chips or flakes out easily, don’t be afraid to exfoliate it – gently. You’ll then be better able to gauge appropriate wall height and heel height.
As we learned above, the frog is a blood-pumping organ within the horse’s hoof and needs to be handled with absolute care. Over-trimming the frog can cause profound problems for your horse.
However, not caring for the frog at all can cause problems too, especially when overgrown or when the frog shows signs of infection. However, cleaning the frog as we did in step 1 will give you an indication of the health status of the frog.
Studying the appearance of a healthy frog will allow you to decide when it needs trimming and when it is better to leave it alone.
Pro-Tip:
Take your time and be patient. In general, you should avoid taking off too much hoof material while you are inexperienced. Instead, shorten your cycles until you are comfortable and knowledgeable enough to see how far to go with your trim.
Don’t be shy to reach out to local trimmers for advice or attend a trimming course. These can not only be fun but will make sure you are going in the right direction when trimming your own horse.
Warning: If you notice any injuries on your horse’s hoof, consult with your veterinarian immediately. A small cut or bruise can easily get out of hand.
Can I Apply FormaHoof Myself After Learning To Trim?
Absolutely! After you’ve got the hang of hoof trimming, you’re ready to apply FormaHoof. Don’t worry; we’re here to guide you every step of the way. Our free introduction to FormaHoof lecture makes to get started learning more about FormaHoof. Watch the video below to see how self-trimming horse owner Kate used our online training to get started!
Before we sign off, here’s a testimonial from one of our happy customers: “Since I started using FormaHoof, my horse’s feet have never been healthier. It’s really made a huge difference! Plus, the online courses are super easy to follow, so I feel confident doing it myself.”
In conclusion, learning to trim your horse’s hooves is a rewarding skill, beneficial for both you and your horse. Start your journey with our educational courses today and see the difference FormaHoof can make in your horse’s life. We can’t wait to help you on this journey.


2 Responses
Hi,
I have a small 14.2 Irish trotter and having watched the farrier clipping her hooves I think I might manage to do it myself if it’s legal?
Regards
Leif Horup
Hi Leif,
Thanks for your comment. While basic hoof clipping is generally unregulated in most places, it’s very important to check the specific laws in your area. For example, in the UK, the law prohibits anyone who isn’t a certified professional from affixing a permanent shoe to a horse’s hoof. As outlined in the relevant provisions of the Farriers (Registration) Act, only a qualified farrier may apply a permanent horseshoe. Please also be cautious when trimming, over-trimming can lead to long-term hoof issues. We always advise to consult a farrier for some direction for the best results.